Skip to content

Scene, Camera and Renderer

Video Lecture

Scene, Camera and Renderer Scene, Camera and Renderer

Description

Three.js, at it's core, is a library that allows you to add and describe data in 3 dimensions, eg, as meshes and lights, and then convert that data into a 2d representation onto a HTML canvas.

Before we can do anything with Three.js, we need 3 things,

  1. Scene
  2. Camera
  3. Renderer

In this video, in order to understand these things better, we discuss and experiment with some of the options we have with each of them.

Scene

Scenes allow you to set up what is to be rendered by three.js and where it is in 3D coordinates. We need a scene, The scene is also sometimes referred to as the scene graph. We can have multiple scenes. When you have a scene, you can then add objects and lighting.

Renderer

The Renderer displays the scene onto a HTML Canvas Element. By default it uses WebGL. WebGL allows GPU-accelerated image processing and effects as the renderer creates the 2D image for the Canvas.

Camera

There are many types of Cameras in Threejs. In this video we experiment with the Perspective and the Orthographic cameras.

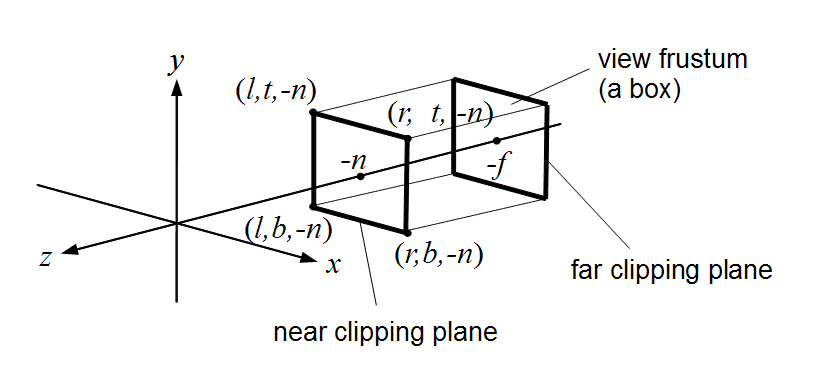
The camera properties describe a Frustum which are the dimensions inside the scene that will be rendered.

The Perspective projection is designed to mimic the way the human eye sees. It is a very common projection mode used when rendering 3D scenes.

Perspective View Frustum

Perspective View Frustum : CC BY-SA 3.0

The Orthographic projection is like a cube in itself where the perspective remains constant regardless of it's distance from the camera.

Orthographic View Frustum

Orthographic View Frustum : CC BY-SA 3.0

It is important to note that the OrthographicCamera constructor expects the values to be in the 3D world units, not pixel units. When you create the PerspectiveCamera, the width and height ratio are based on the canvas pixel dimensions, whereas, if you did this for the OrthographicCamera, you would have very different results depending on screen size and whether your client was a desktop or mobile phone. Instead, you pass coordinates in fixed world units such like a hollow cube. eg, top, bottom, left, right all being 10 for example, means that anything within -5 to 5 on the X axis, and -5 to 5 on the Y axis would be in view, provided your camera target was default at (0,0,0) and looking straight down the Z axis. Your near frame and far frame would decide the visible Z axis range.

Start Script

./src/client/client.ts

 1
 2
 3
 4
 5
 6
 7
 8
 9
10
11
12
13
14
15
16
17
18
19
20
21
22
23
24
25
26
27
28
29
30
31
32
33
34
35
36
37
38
39
40
41
42
43
44
45
46
47
48
49
50
import * as THREE from 'three'
import { OrbitControls } from 'three/examples/jsm/controls/OrbitControls'

const scene = new THREE.Scene()

const camera = new THREE.PerspectiveCamera(
    75,
    window.innerWidth / window.innerHeight,
    0.1,
    1000
)
camera.position.z = 2

const renderer = new THREE.WebGLRenderer()
renderer.setSize(window.innerWidth, window.innerHeight)
document.body.appendChild(renderer.domElement)

new OrbitControls(camera, renderer.domElement)

const geometry = new THREE.BoxGeometry()
const material = new THREE.MeshBasicMaterial({
    color: 0x00ff00,
    wireframe: true,
})

const cube = new THREE.Mesh(geometry, material)
scene.add(cube)

window.addEventListener('resize', onWindowResize, false)
function onWindowResize() {
    camera.aspect = window.innerWidth / window.innerHeight
    camera.updateProjectionMatrix()
    renderer.setSize(window.innerWidth, window.innerHeight)
    render()
}

function animate() {
    requestAnimationFrame(animate)

    cube.rotation.x += 0.01
    cube.rotation.y += 0.01

    render()
}

function render() {
    renderer.render(scene, camera)
}

animate()

Final Scripts

The final code in this video showing the Perspective Camera, the Top, Left and Right Orthographic cameras and using multiple renderers.

<>

./dist/client/index.html

 1
 2
 3
 4
 5
 6
 7
 8
 9
10
11
12
13
14
15
16
17
18
19
20
21
22
23
24
25
26
27
28
29
30
<!DOCTYPE html>
<html lang="en">
    <head>
        <meta charset="utf-8" />
        <meta name="viewport" content="width=device-width, initial-scale=1" />
        <title>
            Three.js TypeScript Tutorials by Sean Bradley :
            https://sbcode.net/threejs
        </title>
        <style>
            body {
                overflow: hidden;
                margin: 0px;
            }

            .c {
                width: 200px;
                height: 200px;
            }
        </style>
    </head>

    <body>
        <canvas id="c1" class="c"></canvas>
        <canvas id="c2" class="c"></canvas>
        <canvas id="c3" class="c"></canvas>
        <canvas id="c4" class="c"></canvas>
        <script type="module" src="bundle.js"></script>
    </body>
</html>

./src/client/client.ts

 1
 2
 3
 4
 5
 6
 7
 8
 9
10
11
12
13
14
15
16
17
18
19
20
21
22
23
24
25
26
27
28
29
30
31
32
33
34
35
36
37
38
39
40
41
42
43
44
45
46
47
48
49
50
51
52
53
54
55
56
57
58
59
60
import * as THREE from 'three'
import { OrbitControls } from 'three/examples/jsm/controls/OrbitControls'

const scene = new THREE.Scene()

const camera1 = new THREE.PerspectiveCamera(75, 1, 0.1, 10)
const camera2 = new THREE.OrthographicCamera(-1, 1, 1, -1, 0.1, 10)
const camera3 = new THREE.OrthographicCamera(-1, 1, 1, -1, 0.1, 10)
const camera4 = new THREE.OrthographicCamera(-1, 1, 1, -1, 0.1, 10)

camera1.position.z = 2
camera2.position.y = 1
camera2.lookAt(new THREE.Vector3(0, 0, 0))
camera3.position.z = 1
camera4.position.x = 1
camera4.lookAt(new THREE.Vector3(0, 0, 0))

const canvas1 = document.getElementById('c1') as HTMLCanvasElement
const canvas2 = document.getElementById('c2') as HTMLCanvasElement
const canvas3 = document.getElementById('c3') as HTMLCanvasElement
const canvas4 = document.getElementById('c4') as HTMLCanvasElement
const renderer1 = new THREE.WebGLRenderer({ canvas: canvas1 })
renderer1.setSize(200, 200)
const renderer2 = new THREE.WebGLRenderer({ canvas: canvas2 })
renderer2.setSize(200, 200)
const renderer3 = new THREE.WebGLRenderer({ canvas: canvas3 })
renderer3.setSize(200, 200)
const renderer4 = new THREE.WebGLRenderer({ canvas: canvas4 })
renderer4.setSize(200, 200)

//document.body.appendChild(renderer.domElement)

new OrbitControls(camera1, renderer1.domElement)

const geometry = new THREE.BoxGeometry()
const material = new THREE.MeshBasicMaterial({
    color: 0x00ff00,
    wireframe: true,
})

const cube = new THREE.Mesh(geometry, material)
scene.add(cube)

function animate() {
    requestAnimationFrame(animate)

    cube.rotation.x += 0.01
    cube.rotation.y += 0.01

    render()
}

function render() {
    renderer1.render(scene, camera1)
    renderer2.render(scene, camera2)
    renderer3.render(scene, camera3)
    renderer4.render(scene, camera4)
}

animate()

Viewing Frustum

Different Projection Models

Perspective Projection

WebGL

Comments